
DIY Log Cabin Decor: Easy Projects to Add Rustic Charm
Log cabins are known for their rustic beauty and natural charm, and the right décor can transform any cabin into a cozy, inviting retreat. Whether you're building a new cabin or updating an existing one, there are numerous DIY projects that can help you bring a touch of rustic charm into your space. From simple upcycling ideas to handcrafted pieces, these projects will enhance the natural beauty of your log cabin and make it feel like home.
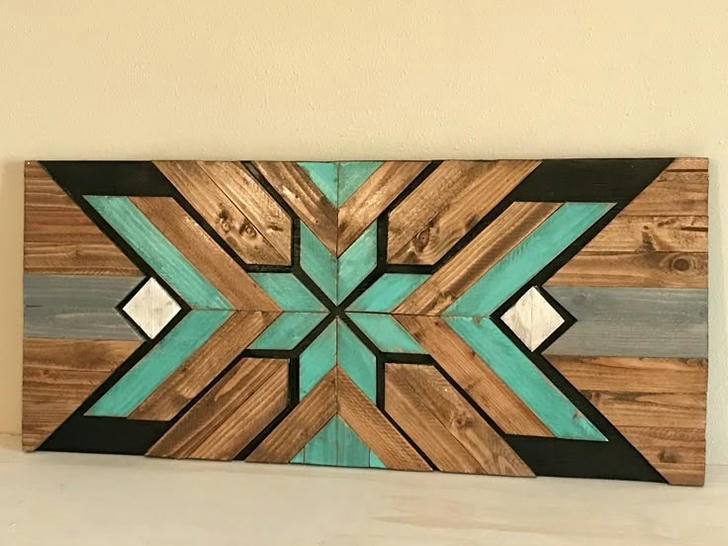
1. Reclaimed Wood Wall Art
One of the easiest ways to add rustic charm to a log cabin is by incorporating reclaimed wood. Whether you use old pallets, barn wood, or leftover scraps from a renovation, reclaimed wood is the perfect material for creating unique and timeless décor pieces.
How to Make It:
Materials Needed: Reclaimed wood, saw, sandpaper, wood glue, nails or screws, paint (optional).
Steps:
1.Select your wood: Gather reclaimed wood pieces. You can use pallet wood, old fencing, or even wooden crates.
2.Cut the pieces: Depending on the design you have in mind, cut the wood into the desired lengths. For a simple look, you can keep the pieces uniform or mix them for a more organic design.
3.Sand the wood: Lightly sand the edges to smooth out rough spots, but leave the natural texture for an authentic rustic look.
4.Assemble the frame: Use wood glue and nails or screws to arrange the pieces into your desired shape—whether it's a grid, a frame for artwork, or an abstract design.
5.Add finishing touches: You can either leave the wood in its natural state, stain it to bring out the grain, or paint it for a more colorful effect.
Why It's Great:
Reclaimed wood wall art adds texture and personality to a log cabin, while showcasing the natural beauty of wood. This project is customizable, allowing you to create unique pieces that suit your cabin’s aesthetic.
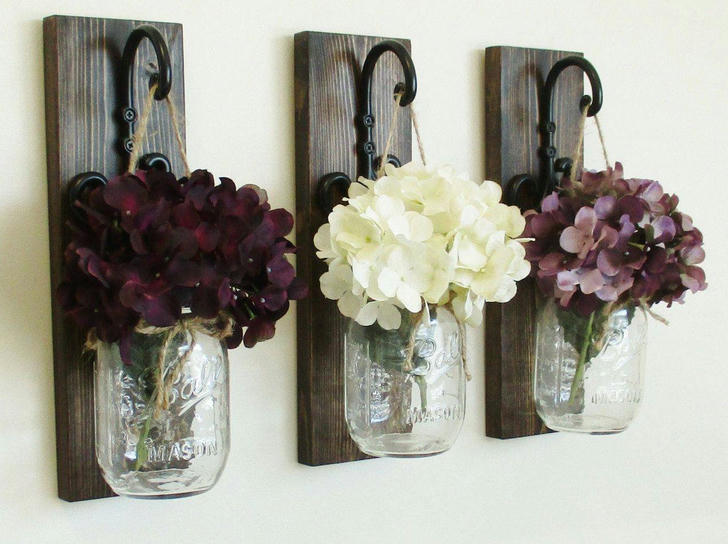
2. Rustic Mason Jar Sconces
Mason jars are a staple of rustic décor, and using them as sconces is a simple yet charming way to add lighting to your cabin. This project will not only brighten up your space but also bring in a touch of country-style warmth.
How to Make It:
Materials Needed: Mason jars, wooden boards, metal brackets, screws, light bulbs, and electrical wiring.
Steps:
1.Prepare the board: Cut a piece of reclaimed wood to the desired length for your sconce. Sand the edges for a smooth finish.
2.Attach the brackets: Secure the metal brackets to the wooden board. These will hold the mason jars in place.
3.Install the mason jars: Screw the mason jars into the brackets. Make sure they're stable and secure.
4.Set up the lighting: Install the electrical wiring and socket fittings inside the mason jars. You can use LED bulbs or vintage-style Edison bulbs to give it a warm, rustic glow.
5.Mount the sconce: Drill holes in the back of the board to attach it to the wall. Mount it at the desired height.
Why It's Great:
Mason jar sconces are easy to make and add a rustic touch to your cabin’s lighting. The soft, warm glow from the bulbs complements the natural wood of the cabin, creating a cozy, inviting atmosphere.
3. Upcycled Barrel Coffee Table
For a truly rustic statement piece, consider turning an old wooden barrel into a coffee table. Not only does this project reuse an item that might otherwise be discarded, but it also gives your cabin a vintage, farmhouse feel.
How to Make It:
Materials Needed: Old wooden barrel, wooden tabletop (optional), sandpaper, varnish, screws.
Steps:
1.Prepare the barrel: If the barrel is still intact, clean it thoroughly and remove any rust or debris. If it’s in rough shape, sand it down to smooth out any rough edges.
2.Add a tabletop: If you want a flat surface, place a wooden round tabletop on top of the barrel. You can choose a wood that matches the tone of the cabin’s floors or opt for a contrasting wood like dark walnut for added visual interest.
3.Secure the tabletop: Attach the tabletop to the barrel with screws or metal brackets for added stability.
4.Finish the barrel: Apply a protective varnish to preserve the wood and give it a polished, rustic finish.
Why It's Great:
The upcycled barrel coffee table is an eye-catching and functional piece of furniture that works perfectly in a log cabin. It’s an easy project that allows you to repurpose old materials and create something truly unique.
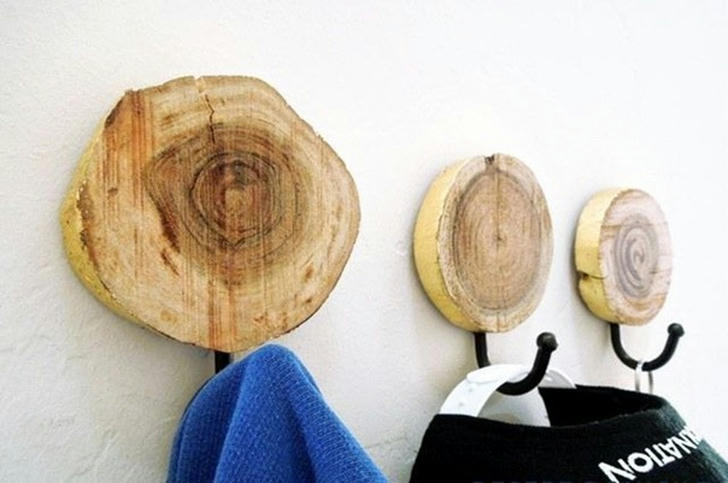
4. Log Slice Wall Hooks
For an easy DIY project that brings the outdoors inside, log slice wall hooks are both practical and rustic. These simple hooks can be used in the entryway, bathroom, or even in the kitchen for hanging coats, towels, or utensils.
How to Make It:
Materials Needed: Log slices, sturdy hooks, drill, screws.
Steps:
1.Cut the log slices: Use a saw to slice a log into thin rounds. Choose a log that fits the rustic aesthetic of your cabin, such as birch, pine, or oak.
2.Drill holes: Drill holes into the log slices to insert the hooks. Ensure the holes are large enough to accommodate the screws.
3.Attach the hooks: Screw sturdy metal hooks into the drilled holes. The hooks should be strong enough to hold coats, towels, or bags.
4.Mount on the wall: Attach the log slices to the wall using screws or mounting brackets. Arrange them in a line or scattered for a more organic look.
Why It's Great:
Log slice wall hooks are a functional and aesthetic way to incorporate natural elements into your cabin. They’re easy to make and add a rustic, outdoorsy charm to any room.
5. Hand-Painted Wooden Signs
Adding hand-painted wooden signs to your log cabin is an easy way to personalize the space. Whether it’s a welcome sign for the entrance or a phrase that makes you feel at home, these signs will add warmth and personality to your cabin’s décor.

How to Make It:
Materials Needed: Reclaimed wood, paint, paintbrushes, stencil (optional), varnish.
Steps:
1.Select your wood: Choose a piece of reclaimed wood that fits the size of your sign. Sand the edges to give it a smooth surface.
2.Design your sign: You can either freehand your design or use a stencil for a more polished look. Popular phrases for log cabins include "Welcome," "Relax," or "The Cabin Life."
3.Paint the design: Use acrylic paint to create your design. If you want a rustic effect, consider using a whitewashed or distressed look.
4.Add finishing touches: Once the paint is dry, apply a varnish to protect the sign and give it a matte or glossy finish.
Why It's Great:
Hand-painted wooden signs are a simple, customizable project that adds character to your log cabin. These signs can reflect your personality and make your space feel more inviting. Conclusion
DIY log cabin décor projects are a fun and rewarding way to add rustic charm to your home. Whether you're upcycling materials, creating custom furniture, or adding personal touches with hand-painted signs and wall art, these projects will enhance the natural beauty of your log cabin.
By tackling these easy DIY ideas, you can transform your cabin into a cozy, personalized retreat that reflects your style. Not only will these projects bring a rustic charm to your space, but they’ll also provide a sense of accomplishment and pride in creating a home that’s truly your own. So, gather your materials and start crafting today—you’ll be amazed at the difference these DIY décor projects can make in your log cabin.
Conclusion
DIY log cabin décor projects are a fun and rewarding way to add rustic charm to your home. Whether you're upcycling materials, creating custom furniture, or adding personal touches with hand-painted signs and wall art, these projects will enhance the natural beauty of your log cabin.
By tackling these easy DIY ideas, you can transform your cabin into a cozy, personalized retreat that reflects your style. Not only will these projects bring a rustic charm to your space, but they’ll also provide a sense of accomplishment and pride in creating a home that’s truly your own. So, gather your materials and start crafting today—you’ll be amazed at the difference these DIY décor projects can make in your log cabin.